St Patrick’s Day Cake Pops: A Festive Treat for the Emerald Isle Celebration

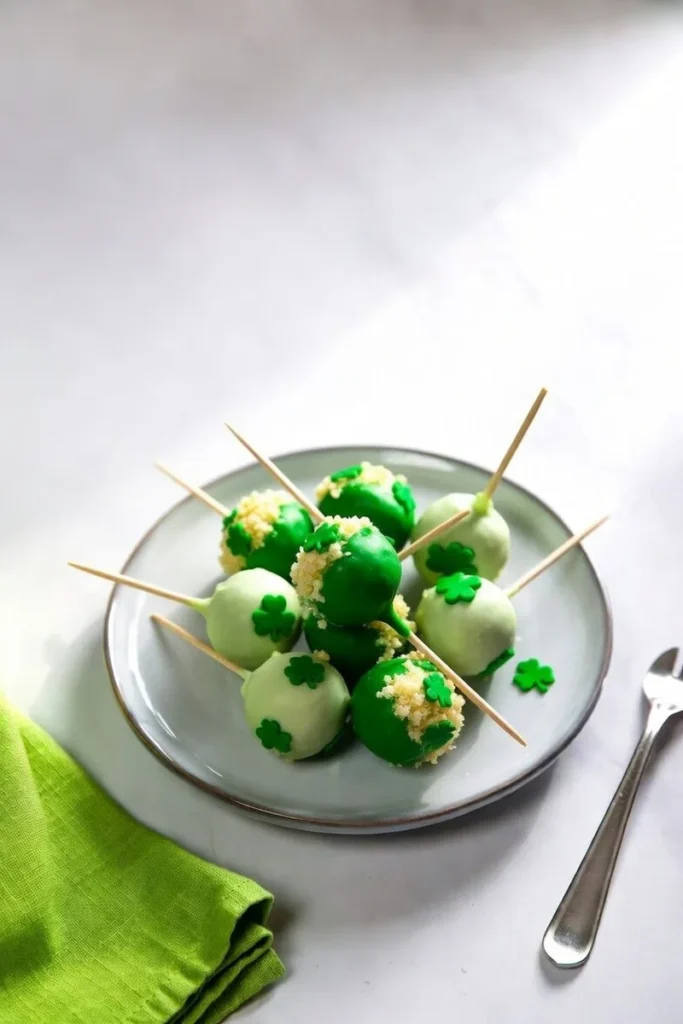
St Patrick’s Day is just around the corner, and what better way to celebrate than with a batch of adorable St Patrick’s Day cake pops? These bite-sized treats are perfect for a family brunch, a classroom party, or even as a sweet gift for friends and loved ones.
Why You’ll Love This Recipe
This recipe is a fun and creative way to get into the St Patrick’s Day spirit, with its vibrant green color and shamrock-themed decorations. The best part?
It’s incredibly easy to make, requiring just a few simple ingredients and some basic baking skills. So, whether you’re a seasoned baker or a beginner, you’ll love this recipe for St Patrick’s Day cake pops.
One of the great things about this recipe is that it’s highly customizable. You can use different types of cake, frosting, and decorations to create a unique and personalized look.
Plus, the cake pops are perfect for a variety of occasions, from St Patrick’s Day parties to baby showers and birthday celebrations.
Ingredients
Here is everything you need to make this recipe from scratch.
1 1/2 cups all-purpose flour , this provides the structure and texture for the cake pops
1 cup granulated sugar , this adds sweetness and tenderness to the cake
2 teaspoons baking powder , this helps the cake rise and gives it a light, airy texture
1/2 teaspoon salt , this enhances the flavor of the cake and helps balance out the sweetness
1/2 cup unsalted butter, softened , this adds moisture and richness to the cake
2 large eggs , these provide moisture, richness, and structure to the cake
2 teaspoons vanilla extract , this adds a subtle, creamy flavor to the cake
Green food coloring , this gives the cake pops their signature green color
Candy melts or white chocolate , this is used to coat the cake pops and give them a smooth, glossy finish
Candy sticks or cake pop sticks , these are used to create the iconic cake pop shape
Shamrock sprinkles or edible decorations , these add a fun, festive touch to the cake pops
Why These Ingredients
All-Purpose Flour
All-purpose flour is a versatile and essential ingredient in this recipe, providing the structure and texture for the cake pops. It’s a good idea to use a high-quality, unbleached all-purpose flour for the best results.
When choosing a flour, consider the protein content, as this can affect the texture and structure of the cake. A flour with a lower protein content will produce a more tender, delicate cake, while a flour with a higher protein content will produce a more dense, chewy cake.
In this recipe, we’re using a standard all-purpose flour with a moderate protein content, which provides a good balance of texture and structure.
Granulated Sugar
Granulated sugar is another essential ingredient in this recipe, adding sweetness and tenderness to the cake. It’s a good idea to use a high-quality, pure granulated sugar for the best results.
When choosing a sugar, consider the type and quality, as this can affect the flavor and texture of the cake. A finer, more refined sugar will produce a more tender, delicate cake, while a coarser, more rustic sugar will produce a more dense, chewy cake.
In this recipe, we’re using a standard granulated sugar, which provides a good balance of sweetness and texture.
Instructions
Let’s walk through every step in detail so your St Patrick’s Day cake pops turn out perfectly.
Step 1: Preheat and Prep , Preheat your oven to 350°F (180°C). Line a baking tray with parchment paper and lightly grease it.
This step is important because a cold oven will affect how the cake pops bake.
Step 2: Mix Dry Ingredients , In a large mixing bowl, whisk together the flour, sugar, baking powder, and salt until fully combined. Make sure there are no lumps , this ensures even distribution throughout the batter.
Step 3: Mix Wet Ingredients , In a separate mixing bowl, whisk together the butter, eggs, and vanilla extract until smooth and creamy. This step is important because it helps to incorporate air and moisture into the batter.
Step 4: Combine Wet and Dry Ingredients , Gradually add the dry ingredients to the wet ingredients, mixing until just combined. Be careful not to overmix, as this can result in a dense, tough cake.
Step 5: Add Green Food Coloring , Add a few drops of green food coloring to the batter and mix until the color is evenly distributed. This step is important because it gives the cake pops their signature green color.
Step 6: Bake the Cake , Pour the batter into a greased and floured cake pan and bake for 20-25 minutes, or until a toothpick inserted into the center comes out clean. This step is important because it helps to cook the cake evenly and prevent it from burning.
Step 7: Prepare the Cake Pops , Once the cake is cool, crumble it into a large mixing bowl and add a small amount of frosting or buttercream. Mix until the cake is well coated and forms a sticky dough.
This step is important because it helps to bind the cake together and create a smooth, even texture.
Step 8: Shape the Cake Pops , Use a small cookie scoop or spoon to form the cake mixture into balls, about 1 1/2 inches in diameter. This step is important because it helps to create a uniform shape and size for the cake pops.
Step 9: Dip the Cake Pops , Melt the candy melts or white chocolate in a double boiler or in the microwave in 30-second increments, stirring between each interval. Dip the end of a candy stick or cake pop stick into the melted candy and insert it into each cake ball, about halfway through.
This step is important because it helps to create a smooth, glossy finish and attach the stick to the cake pop.
Step 10: Decorate the Cake Pops , Dip the cake pops into the melted candy, using a fork or dipping tool to fully coat the cake. Tap off any excess candy by gently tapping the fork or dipping tool against the side of the bowl.
This step is important because it helps to create a smooth, even coating and prevent the candy from pooling at the bottom of the cake pop.
Step 11: Add Shamrock Sprinkles , Immediately after coating the cake pop, sprinkle with shamrock sprinkles or edible decorations. This step is important because it adds a fun, festive touch to the cake pops and helps to create a personalized look.
How To Serve
serve the St Patrick’s Day cake pops at room temperature, on a stick or on a platter, and enjoy as a sweet treat. You can also package them in cellophane bags or containers and give them as gifts.
serve the cake pops as a dessert or snack at a St Patrick’s Day party or celebration. You can also use them as a fun and creative way to decorate a cake or cupcake tower.
serve the cake pops as a sweet treat at a baby shower or birthday party. You can also use them as a fun and creative way to decorate a dessert table or buffet.
serve the cake pops as a fun and easy snack for a crowd. You can also use them as a creative way to decorate a cake or cupcake stand.
How To Keep Leftovers
Room Temperature
store the cake pops at room temperature in an airtight container for up to 3 days.
Make sure to keep them away from direct sunlight and heat sources, as this can cause the candy to melt or become sticky.
Refrigerator
store the cake pops in the refrigerator in an airtight container for up to 5 days. Make sure to keep them away from strong-smelling foods, as the cake pops can absorb odors easily.
Freezer
store the cake pops in the freezer in an airtight container for up to 2 months. Make sure to thaw the cake pops at room temperature or in the refrigerator before serving.
Top Tips
Use High Quality Ingredients
Using high quality ingredients, such as real butter and pure vanilla extract, can make a big difference in the flavor and texture of the cake pops.
Don’t Overmix the Batter
Overmixing the batter can result in a dense, tough cake, so make sure to mix the ingredients just until they’re combined.
Use the Right Consistency of Candy
The consistency of the candy is important, as it can affect the texture and appearance of the cake pops.
Make sure to use a high quality candy melt or white chocolate that’s easy to work with.
Experiment with Different Flavors
You can experiment with different flavors, such as mint or orange, to create a unique and personalized taste.
Just make sure to use high quality flavorings and extracts to get the best results.
Have Fun and Be Creative
The most important thing is to have fun and be creative when making the cake pops.
Experiment with different decorations, flavors, and shapes to create a unique and personalized treat.
Final Thoughts
With these St Patrick’s Day cake pops, you’ll have a fun and delicious way to celebrate the Emerald Isle’s special day.
Whether you’re making them for a party, a gift, or just for fun, these cake pops are sure to bring a smile to everyone’s face.
So go ahead, get creative, and make some magical St Patrick’s Day cake pops!
St Patrick’s Day Cake Pops: A Festive Treat for the Emerald Isle Celebration
Description
Celebrate St Patrick's Day with these adorable and delicious cake pops, perfect for a family brunch, classroom party, or as a sweet gift for friends and loved ones.
Ingredients
Instructions
-
Preheat the oven to 350?F (180?C).
-
In a large mixing bowl, whisk together the flour, sugar, baking powder, and salt.
-
In a separate mixing bowl, whisk together the butter, eggs, and vanilla extract.
-
Gradually add the dry ingredients to the wet ingredients, mixing until just combined.
-
Add a few drops of green food coloring to the batter and mix until the color is evenly distributed.
-
Pour the batter into a greased and floured cake pan and bake for 20-25 minutes, or until a toothpick inserted into the center comes out clean.
-
Once the cake is cool, crumble it into a large mixing bowl and add a small amount of frosting or buttercream.
-
Use a small cookie scoop or spoon to form the cake mixture into balls, about 1 1/2 inches in diameter.
-
Melt the candy melts or white chocolate in a double boiler or in the microwave in 30-second increments, stirring between each interval.
-
Dip the end of a candy stick or cake pop stick into the melted candy and insert it into each cake ball, about halfway through.
-
Dip the cake pops into the melted candy, using a fork or dipping tool to fully coat the cake.
-
Tap off any excess candy by gently tapping the fork or dipping tool against the side of the bowl.
-
Immediately after coating the cake pop, sprinkle with shamrock sprinkles or edible decorations.
Nutrition Facts
Servings 12
- Amount Per Serving
- Calories 250kcal
- % Daily Value *
- Cholesterol 20mg7%
- Sodium 50mg3%
- Potassium 100mg3%
- Total Carbohydrate 30g10%
- Sugars 20g
- Protein 2g4%
- Calcium 10 mg
- Iron 1 mg
- Phosphorus 50 mg
- Magnesium 10 mg
* Percent Daily Values are based on a 2,000 calorie diet. Your daily value may be higher or lower depending on your calorie needs.
Note
You can customize the recipe with different flavors, decorations, and shapes to create a unique and personalized treat.
Frequently Asked Questions
Is this recipe easy to make?
Yes, this recipe is very beginner-friendly and comes together in under 30 minutes.
Can I make it ahead of time?
Absolutely. You can prepare it up to 2 days in advance and store it in the fridge.
Do I need any special equipment?
No, you don't need any special equipment, just a standard mixing bowl, whisk, and baking sheet.
Can I customize the recipe?
Yes, you can customize the recipe with different flavors, decorations, and shapes to create a unique and personalized treat.