
This post may contain affiliate links. Please read my disclosure policy .
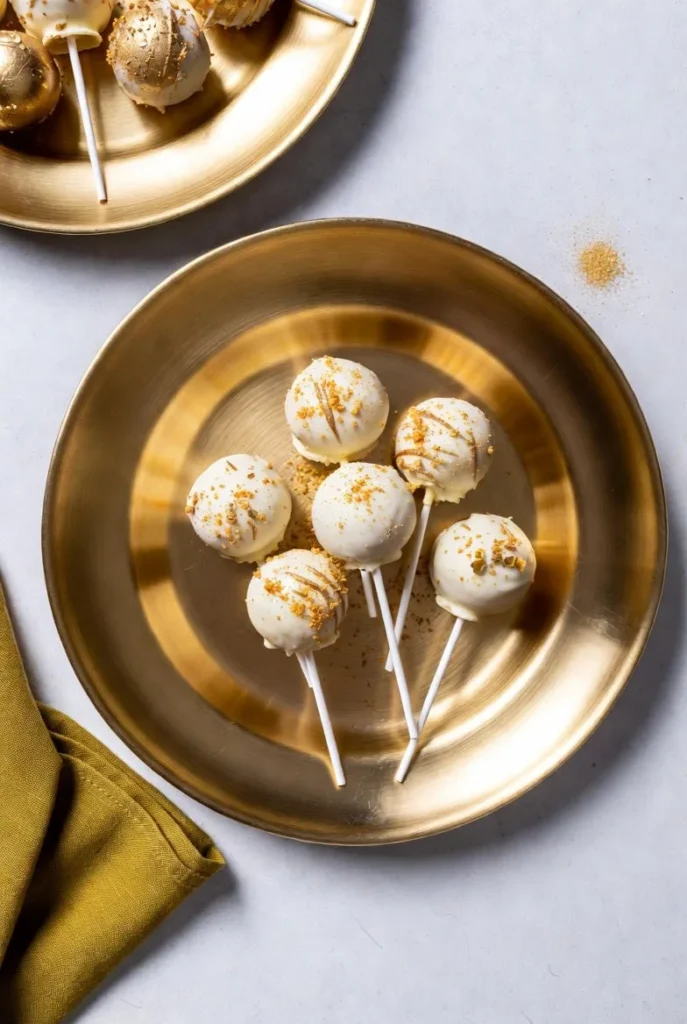
Are you ready to find the pot of gold at the end of the rainbow? Look no further than these adorable Pot of Gold Cake Pops, perfect for St.
Patrick’s Day celebrations. Made with moist cake, creamy frosting, and a hint of luck, these treats are sure to bring a smile to everyone’s face.
Why You’ll Love This Recipe
This recipe is a fun and creative way to celebrate St. Patrick’s Day with your loved ones.
The Pot of Gold Cake Pops are easy to make and require minimal ingredients, making them a great activity for kids and adults alike. Plus, who wouldn’t love a sweet treat that’s shaped like a pot of gold?
The best part about this recipe is that it’s highly customizable. You can use different types of cake and frosting to create unique flavor combinations, and add your own personal touch with decorative elements like sprinkles, edible glitter, or even a tiny rainbow on top.
Ingredients
Here is everything you need to make this recipe from scratch.
1 1/2 cups all-purpose flour , This type of flour provides structure and texture to the cake, and is a crucial component in creating a moist and tender crumb.
1 cup granulated sugar , Granulated sugar adds sweetness and tenderness to the cake, and helps to balance out the flavors of the other ingredients.
2 teaspoons baking powder , Baking powder is a leavening agent that helps the cake to rise and gives it a light, airy texture.
1/2 teaspoon salt , A pinch of salt enhances the flavors of the other ingredients and helps to balance out the sweetness of the sugar.
1/2 cup unsalted butter, softened , Softened butter adds moisture and tenderness to the cake, and helps to create a smooth, creamy texture.
2 large eggs , Eggs provide moisture, richness, and structure to the cake, and help to bind the ingredients together.
2 teaspoons vanilla extract , Vanilla extract adds a sweet, creamy flavor to the cake and helps to balance out the other ingredients.
1 cup creamy frosting , Creamy frosting is used to bind the cake together and create a smooth, creamy texture. You can use store-bought or homemade frosting, depending on your preference.
Candy melts or white chocolate , Candy melts or white chocolate are used to coat the cake pops and create a smooth, glossy finish. You can also use colored candy melts to match your desired color scheme.
Gold dust or edible glitter , Gold dust or edible glitter adds a touch of luxury and whimsy to the cake pops, and helps to create a festive, celebratory atmosphere.
Lollipop sticks or cake pop sticks , Lollipop sticks or cake pop sticks are used to create the base of the cake pops and provide a sturdy foundation for the cake and frosting.
Why These Ingredients
All-Purpose Flour
All-purpose flour is a crucial component in this recipe, providing structure and texture to the cake. It’s a versatile ingredient that can be used in a variety of baked goods, from cakes and cookies to breads and pastries.
When choosing an all-purpose flour, look for a high-quality brand that is fresh and has a fine texture.
It’s also important to note that all-purpose flour can be substituted with other types of flour, such as bread flour or cake flour, depending on the desired texture and flavor. However, keep in mind that using a different type of flour may affect the overall consistency and taste of the cake.
Granulated Sugar
Granulated sugar adds sweetness and tenderness to the cake, and helps to balance out the flavors of the other ingredients. It’s a crucial component in creating a moist and tender crumb, and is a versatile ingredient that can be used in a variety of baked goods.
When choosing a granulated sugar, look for a high-quality brand that is fresh and has a fine texture. You can also use other types of sugar, such as brown sugar or turbinado sugar, depending on the desired flavor and texture.
Instructions
Let’s walk through every step in detail so your recipe turns out perfectly.
Step 1: Preheat and Prep , Preheat your oven to 180°C (350°F). Line a baking tray with parchment paper and lightly grease it.
This step is important because a cold oven will affect how the cake spreads and a greased baking tray will prevent the cake from sticking.
Step 2: Mix Dry Ingredients , In a large mixing bowl, whisk together the flour, sugar, baking powder, and salt until fully combined. Make sure there are no lumps , this ensures even distribution throughout the batter.
Step 3: Mix Wet Ingredients , In a separate mixing bowl, whisk together the softened butter, eggs, and vanilla extract until smooth and creamy. This step is important because it helps to create a moist and tender crumb.
Step 4: Combine Wet and Dry Ingredients , Gradually add the dry ingredients to the wet ingredients, mixing until just combined. Be careful not to overmix , this can result in a dense and tough cake.
Step 5: Bake the Cake , Pour the batter into the prepared baking tray and bake for 20-25 minutes, or until a toothpick inserted into the center comes out clean. Let the cake cool completely before proceeding to the next step.
Step 6: Prepare the Frosting , If using store-bought frosting, follow the instructions on the package to prepare it. If using homemade frosting, whip the frosting until it’s smooth and creamy.
Step 7: Crumb the Cake , Once the cake is completely cool, crumb it into a large mixing bowl using a fork or your hands. This step is important because it helps to create a smooth and even texture.
Step 8: Add Frosting and Mix , Add a small amount of frosting to the crumbled cake and mix until the cake is well coated. You can add more frosting as needed, but be careful not to add too much , this can result in a cake that’s too wet and falls apart.
Step 9: Shape the Cake Pops , Use a small cookie scoop or your hands to shape the cake mixture into small balls, about 1 inch in diameter. You should end up with around 12-15 cake pops.
Step 10: Melt the Candy Melts , Melt the candy melts or white chocolate in a microwave-safe bowl in 30-second increments, stirring between each interval, until smooth and creamy.
Step 11: Dip the Cake Pops , Dip the end of a lollipop stick or cake pop stick into the melted candy and insert it into each cake ball, about halfway through. Then, dip the cake pop into the melted candy, using a fork or dipping tool to fully coat the cake pop.
Step 12: Add Gold Dust or Edible Glitter , Immediately after dipping the cake pop, sprinkle with gold dust or edible glitter to create a festive and celebratory look.
How To Serve
serve the Pot of Gold Cake Pops at a St. Patrick’s Day party or celebration, paired with a side of Irish coffee or green beer.
The cake pops are perfect for a festive and fun celebration, and the gold dust or edible glitter adds a touch of luxury and whimsy.
serve the cake pops at a baby shower or bridal shower, paired with a side of tea or coffee. The cake pops are a great way to add a touch of elegance and sophistication to any celebration, and the gold dust or edible glitter adds a touch of glamour and fun.
serve the cake pops at a birthday party or anniversary celebration, paired with a side of ice cream or cake. The cake pops are a great way to add a touch of fun and celebration to any party, and the gold dust or edible glitter adds a touch of magic and wonder.
serve the cake pops at a wedding or wedding shower, paired with a side of champagne or wine. The cake pops are a great way to add a touch of elegance and sophistication to any celebration, and the gold dust or edible glitter adds a touch of romance and glamour.
How To Keep Leftovers
Room Temperature
You can store the cake pops at room temperature for up to 3 days, in an airtight container. Make sure to keep them away from direct sunlight and heat sources, as this can cause the candy melts to melt or become discolored.
It’s also important to note that the cake pops are best served fresh, so try to consume them within a day or two of making them. If you need to store them for a longer period, consider freezing them or storing them in the refrigerator.
Refrigerator
You can store the cake pops in the refrigerator for up to 5 days, in an airtight container. Make sure to keep them away from strong-smelling foods, as the cake pops can absorb odors easily.
When you’re ready to serve the cake pops, simply remove them from the refrigerator and let them come to room temperature. You can also serve them chilled, if you prefer.
Freezer
You can store the cake pops in the freezer for up to 2 months, in an airtight container. Make sure to wrap the cake pops individually in plastic wrap or aluminum foil, to prevent them from sticking together.
When you’re ready to serve the cake pops, simply remove them from the freezer and let them thaw at room temperature. You can also thaw them in the refrigerator or microwave, if you prefer.
Top Tips
Use High Quality Ingredients
Using high quality ingredients is crucial in creating a moist and tender cake, and a smooth and creamy frosting. Look for fresh and high-quality ingredients, and avoid using low-quality or expired ingredients.
It’s also important to note that using high-quality ingredients can affect the overall flavor and texture of the cake pops. For example, using high-quality chocolate can create a richer and more decadent flavor, while using low-quality chocolate can create a bland and unappealing flavor.
Don’t Overmix the Batter
Overmixing the batter can result in a dense and tough cake, so make sure to mix the ingredients just until they’re combined. This will help to create a moist and tender crumb, and a smooth and creamy texture.
It’s also important to note that overmixing the batter can affect the overall texture of the cake pops. For example, if the batter is overmixed, the cake pops may be dense and heavy, rather than light and airy.
Use the Right Amount of Frosting
Using the right amount of frosting is crucial in creating a smooth and creamy texture, and a moist and tender crumb. If you use too much frosting, the cake pops may be too wet and fall apart, while if you use too little frosting, the cake pops may be too dry and crumbly.
It’s also important to note that using the right amount of frosting can affect the overall flavor of the cake pops. For example, if you use too much frosting, the cake pops may be too sweet and overpowering, while if you use too little frosting, the cake pops may be too bland and unappealing.
Final Thoughts
These Pot of Gold Cake Pops are a fun and creative way to celebrate St. Patrick’s Day, and are perfect for parties, celebrations, and special occasions.
With their moist and tender cake, smooth and creamy frosting, and touch of gold dust or edible glitter, they’re sure to bring a smile to everyone’s face. So why not give them a try and see what you think?
Pot of Gold Cake Pops: A Magical St. Patrick’s Day Treat
Description
These Pot of Gold Cake Pops are a fun and creative way to celebrate St. Patrick's Day, with their moist and tender cake, smooth and creamy frosting, and touch of gold dust or edible glitter. Perfect for parties, celebrations, and special occasions.
Ingredients
Instructions
-
Preheat the oven to 180?C (350?F).
-
In a large mixing bowl, whisk together the flour, sugar, baking powder, and salt until fully combined.
-
In a separate mixing bowl, whisk together the softened butter, eggs, and vanilla extract until smooth and creamy.
-
Gradually add the dry ingredients to the wet ingredients, mixing until just combined.
-
Pour the batter into a prepared baking tray and bake for 20-25 minutes, or until a toothpick inserted into the center comes out clean.
-
Let the cake cool completely before proceeding to the next step.
-
Crumble the cake into a large mixing bowl using a fork or your hands.
-
Add a small amount of frosting to the crumbled cake and mix until the cake is well coated.
-
Use a small cookie scoop or your hands to shape the cake mixture into small balls, about 1 inch in diameter.
-
Melt the candy melts or white chocolate in a microwave-safe bowl in 30-second increments, stirring between each interval, until smooth and creamy.
-
Dip the end of a lollipop stick or cake pop stick into the melted candy and insert it into each cake ball, about halfway through.
-
Dip the cake pop into the melted candy, using a fork or dipping tool to fully coat the cake pop.
-
Immediately after dipping the cake pop, sprinkle with gold dust or edible glitter to create a festive and celebratory look.
Nutrition Facts
Servings 12
- Amount Per Serving
- Calories 250kcal
- % Daily Value *
- Cholesterol 20mg7%
- Sodium 100mg5%
- Potassium 50mg2%
- Total Carbohydrate 30g10%
- Sugars 20g
- Protein 2g4%
- Calcium 10 mg
- Iron 1 mg
- Phosphorus 10 mg
* Percent Daily Values are based on a 2,000 calorie diet. Your daily value may be higher or lower depending on your calorie needs.
Note
You can customize the recipe to fit your needs and preferences. You can use different types of cake and frosting, and add your own personal touch with decorative elements like sprinkles, edible glitter, or even a tiny rainbow on top.
Frequently Asked Questions
Is this recipe easy to make?
Yes, this recipe is very beginner-friendly and comes together in under 30 minutes.
Can I make it ahead of time?
Absolutely. You can prepare it up to 2 days in advance and store it in the fridge.
How do I store the cake pops?
You can store the cake pops at room temperature for up to 3 days, in an airtight container. You can also store them in the refrigerator for up to 5 days, or in the freezer for up to 2 months.
What type of frosting should I use?
You can use store-bought or homemade frosting, depending on your preference. If you're using homemade frosting, make sure to whip it until it's smooth and creamy.
Can I customize the recipe?
Yes, you can customize the recipe to fit your needs and preferences. You can use different types of cake and frosting, and add your own personal touch with decorative elements like sprinkles, edible glitter, or even a tiny rainbow on top.