
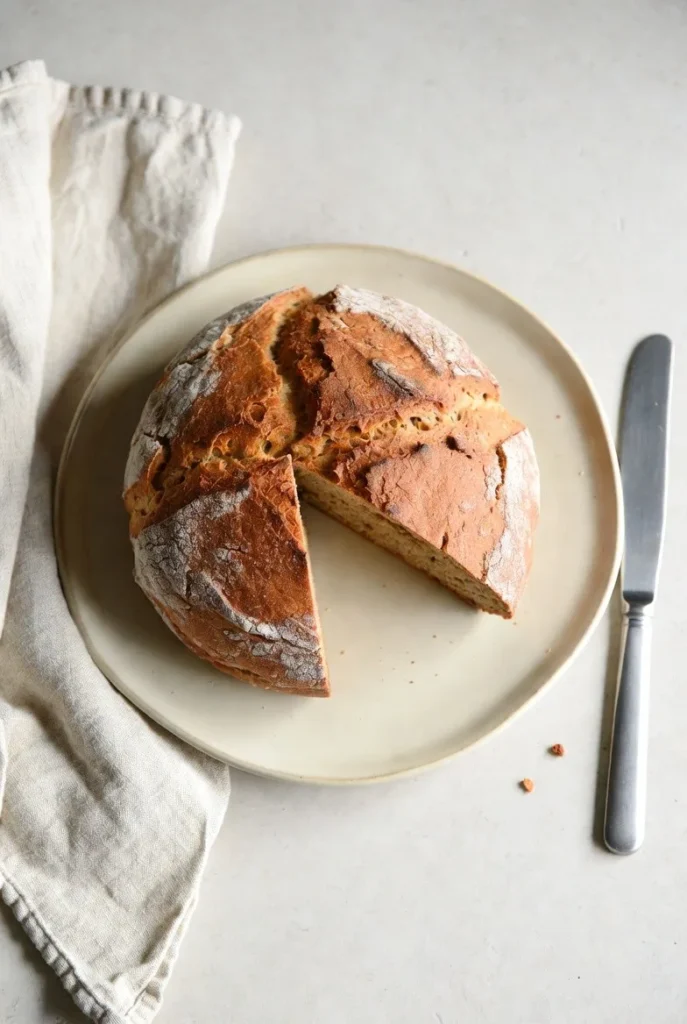
If you’re looking for a classic Irish recipe with a gluten free twist, you’ve come to the right place. Gluten free Irish soda bread is a staple in many Irish households, and for good reason it’s easy to make, delicious, and perfect for serving alongside your favorite soups or stews.
Why You’ll Love This Recipe
This gluten free Irish soda bread recipe is a game-changer for those with gluten intolerance or sensitivity. It’s made with a simple blend of gluten-free flours, buttermilk, and a few other basic ingredients.
The result is a moist, flavorful loaf that’s perfect for snacking or serving as a side dish.
One of the best things about this recipe is how easy it is to make. You don’t need any special equipment or ingredients, and the entire process from start to finish takes less than an hour.
Plus, the ingredients are relatively inexpensive, making it a great option for those on a budget.
Ingredients
Here is everything you need to make this recipe from scratch.
1 1/2 cups gluten-free all-purpose flour , this type of flour is essential for creating a tender, gluten-free crumb. Look for a blend that contains a mix of rice flour, potato starch, and tapioca flour.
1/4 cup granulated sugar , a small amount of sugar helps to balance out the flavor of the bread and creates a nice golden brown crust.
1/2 teaspoon baking soda , this ingredient helps the bread to rise and gives it a light, airy texture.
1/2 teaspoon salt , a pinch of salt enhances the flavor of the bread and helps to bring out the other ingredients.
1/2 cup buttermilk , buttermilk adds a tangy, creamy flavor to the bread and helps to keep it moist. If you don’t have buttermilk, you can make a substitute by mixing 1/2 cup of milk with 1 tablespoon of white vinegar or lemon juice.
1 large egg , the egg helps to bind the ingredients together and adds richness to the bread.
2 tablespoons unsalted butter, melted , melted butter adds flavor and tenderness to the bread. You can also use olive oil or another type of oil if you prefer.
Why These Ingredients
Gluten Free Flour
Gluten-free flour is a crucial ingredient in this recipe, as it allows the bread to be gluten-free while still providing structure and texture. There are many different types of gluten-free flours available, but a blend that contains a mix of rice flour, potato starch, and tapioca flour works well.
When choosing a gluten-free flour, look for a blend that is specifically designed for baking. These blends usually contain a combination of ingredients that are designed to mimic the texture and structure of traditional wheat flour.
One thing to keep in mind when working with gluten-free flour is that it can be more dense and heavy than traditional flour. To combat this, make sure to use a light touch when mixing the ingredients and don’t overmix the batter.
Buttermilk
Buttermilk is another essential ingredient in this recipe, as it adds a tangy, creamy flavor to the bread. If you don’t have buttermilk, you can make a substitute by mixing 1/2 cup of milk with 1 tablespoon of white vinegar or lemon juice.
Buttermilk is a type of cultured milk that contains bacteria that help to break down the lactose. This process gives buttermilk its characteristic tangy flavor and thick, creamy texture.
In addition to its flavor, buttermilk also helps to keep the bread moist and tender. The acidity in the buttermilk helps to break down the starches in the flour, creating a more tender crumb.
Instructions
Let’s walk through every step in detail so your recipe turns out perfectly.
Step 1: Preheat and Prep , Preheat your oven to 400°F (200°C). Line a baking sheet with parchment paper and lightly grease it.
This step is important because a cold oven will affect how the bread cooks.
Step 2: Mix Dry Ingredients , In a large mixing bowl, whisk together the gluten-free flour, sugar, baking soda, and salt until well combined. Make sure to use a light touch and don’t overmix the ingredients.
Step 3: Mix Wet Ingredients , In a separate bowl, whisk together the buttermilk, egg, and melted butter until well combined.
Step 4: Combine Wet and Dry Ingredients , Add the wet ingredients to the dry ingredients and stir until just combined. The batter should still be slightly lumpy.
Step 5: Shape the Bread , Turn the dough out onto a floured surface and gently shape it into a round loaf. Place the loaf onto the prepared baking sheet.
Step 6: Bake the Bread , Bake the bread for 35-40 minutes, or until it’s golden brown and sounds hollow when tapped on the bottom.
How To Serve
serve the bread warm, sliced and topped with butter or jam. This is a great way to enjoy the bread as a snack or side dish.
use the bread to make sandwiches or toast. The bread is perfect for holding up to juicy meats or cheeses.
serve the bread alongside a bowl of soup or stew. The bread is perfect for dipping into your favorite soups or stews.
use the bread to make croutons or breadcrumbs. Simply cube the bread and toss it with some olive oil and your favorite seasonings, then bake until crispy.
How To Keep Leftovers
Room Temperature
the bread can be stored at room temperature for up to 2 days. Simply wrap it tightly in plastic wrap or aluminum foil and keep it in a cool, dry place.
When storing the bread at room temperature, make sure to keep it away from direct sunlight and heat sources. This will help to prevent the bread from becoming stale or dry.
To refresh the bread, simply wrap it in foil and heat it in the oven at 350°F (180°C) for a few minutes.
Refrigerator
the bread can be stored in the refrigerator for up to 5 days. Simply wrap it tightly in plastic wrap or aluminum foil and keep it in the fridge.
When storing the bread in the refrigerator, make sure to keep it away from strong-smelling foods, as the bread can absorb odors easily.
To refresh the bread, simply wrap it in foil and heat it in the oven at 350°F (180°C) for a few minutes.
Freezer
the bread can be frozen for up to 2 months. Simply wrap it tightly in plastic wrap or aluminum foil and place it in a freezer safe bag.
When freezing the bread, make sure to label it with the date and contents, and keep it at 0°F (-18°C) or below.
To thaw the bread, simply leave it at room temperature overnight or thaw it in the microwave according to the manufacturer’s instructions.
Top Tips
Use the Right Flour
Using the right type of flour is crucial for creating a tender, gluten free crumb.
Look for a blend that contains a mix of rice flour, potato starch, and tapioca flour.
Don’t Overmix
Overmixing the batter can lead to a dense, tough bread.
Make sure to use a light touch and don’t overmix the ingredients.
Use Buttermilk
Buttermilk adds a tangy, creamy flavor to the bread and helps to keep it moist.
If you don’t have buttermilk, you can make a substitute by mixing 1/2 cup of milk with 1 tablespoon of white vinegar or lemon juice.
Don’t Overbake
Overbaking the bread can lead to a dry, crumbly texture.
Make sure to check the bread frequently during the baking time and remove it from the oven when it’s golden brown and sounds hollow when tapped on the bottom.
Let it Cool
Letting the bread cool completely before slicing or serving is crucial for creating a tender, crumbly texture.
If you slice the bread too soon, it can become dense and tough.
Final Thoughts
Gluten free Irish soda bread is a delicious and easy to make recipe that’s perfect for serving alongside your favorite soups or stews. With its tender, gluten free crumb and tangy, creamy flavor, it’s a great option for those with gluten intolerance or sensitivity.
So go ahead, give it a try, and enjoy the warm, comforting taste of traditional Irish soda bread in your own home.
Gluten Free Irish Soda Bread: A Traditional Recipe Made Easy
Description
Warm, comforting, and perfect for serving alongside your favorite soups or stews, this gluten free Irish soda bread recipe is a game-changer for those with gluten intolerance or sensitivity. Made with a simple blend of gluten-free flours, buttermilk, and a few other basic ingredients, this recipe is easy to make and delicious to eat.
Ingredients
Instructions
-
Preheat the oven to 400?F (200?C) and line a baking sheet with parchment paper.
-
In a large mixing bowl, whisk together the gluten-free flour, sugar, baking soda, and salt until well combined.
-
In a separate bowl, whisk together the buttermilk, egg, and melted butter until well combined.
-
Add the wet ingredients to the dry ingredients and stir until just combined.
-
Turn the dough out onto a floured surface and gently shape it into a round loaf.
-
Place the loaf onto the prepared baking sheet and bake for 35-40 minutes, or until it's golden brown and sounds hollow when tapped on the bottom.
Nutrition Facts
Servings 8
- Amount Per Serving
- Calories 250kcal
- % Daily Value *
- Cholesterol 20mg7%
- Sodium 200mg9%
- Potassium 100mg3%
- Total Carbohydrate 40g14%
- Dietary Fiber 2g8%
- Sugars 5g
- Protein 5g10%
- Calcium 10 mg
- Iron 1 mg
* Percent Daily Values are based on a 2,000 calorie diet. Your daily value may be higher or lower depending on your calorie needs.
Note
For an extra crispy crust, try baking the bread for an additional 5-10 minutes. You can also add in some dried herbs or spices to give the bread an extra boost of flavor.
Frequently Asked Questions
Is this recipe easy to make?
Yes, this recipe is very beginner-friendly and comes together in under an hour.
Can I make it ahead of time?
Absolutely. You can prepare it up to 2 days in advance and store it in the fridge.
Can I freeze the bread?
Yes, the bread can be frozen for up to 2 months. Simply wrap it tightly in plastic wrap or aluminum foil and place it in a freezer-safe bag.